Rebuild for the Wars


20-5-02 Rebuild for the Wars

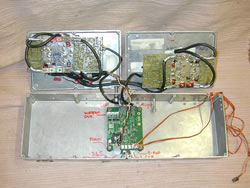
This is the new Speed control set up. The entire system is now housed in these die cast boxes, and links to the real world via 3 anderson connectors , and 2 RC leads to the Rx.
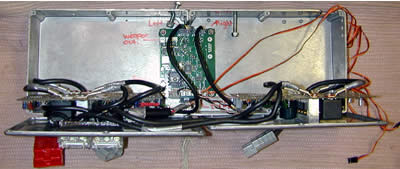
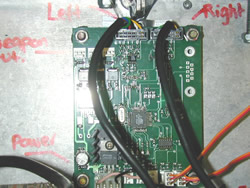
The new interface sits centrally in the case mounted on rubber diablo mounts to damp out vibration. The 4QD speed controllers are mounted directly to the lids with brass screws and heat sink compound. I have plans to add a fan/ filter set up, but to quite honest the ncc70's don't get hot enough. (Need bigger controllers, or more volts at the very least)
The same connectors that ran to the DCI, now connect the speedies to the new board, one for the left motor, one for the right. The pink and black wire take power directly from the battery, (so no need for Rx batteries), and convert it to a useable Rx voltage. The other two connectors run to the Rx. There are 5 input connectors, 2 drive channels and 3 weapons.
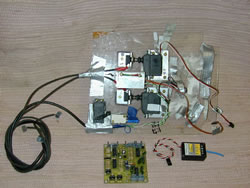
And this is what that tiny 4"x4" board replaces...
2 servo's connected to potentiometers, plus brackets.
A servo and microswitch connected to a failsafe.
A DCI interface board.
A powertrac Rc switch
A 4.8v Rx battery pack (not shown).
Once the board was mounted,the whole system takes about 15-20 minutes to setup, has reassuring led's letting you know what's going on. The performance difference is quite marked, previously there was a small but noticeable lag, from the servo twisting the pot to action and speed control response. Now the response is instant, giving a very precise and accurate control. I ran the first real test at at evening "demonstration" to the local church youth group, and it went very well.

With the controls sorted I decided I really should get ready for Robot Wars. Rumour has it the qualifiers are in the first week of July, which gives me just short of 6 weeks to get up to speed.
I started the afternoons efforts by weighing the whole setup. With full armour kc2 weighs around 110kg. I need to actually ADD metal, to make some outriggers at the back, to give a leverage point for the lifter, so I'm going to have to remove something substantial. The only option without going for a complete new chassis is to chop off the whole front of the robot, so I drilled out the rivets holding some of the lexan in place, and wheeled out plasma cutter. I finished the initial surgery off with a 9" angle grinder, and lugged the chassis back to the blacksmiths shop, where KC2 lives at the minute. The steel removed weighs in at around 9kgs so I still need to trim things down. The most obvious option is to trim down the ally plate armour, which really does weigh a lot.

Comments

Popular posts from this blog

The weakness of machines

All of the robots I have built have failed in fights, and usually at the axles/wheels, it's like a running joke. So why should it be any different with this featherweight? Meathammer was designed back in 2005/06 when using 4 drill motors was a bit of a novelty... it was made more novel still by mounting the epicyclic gear cages directly to the chassis, which unfortunately sends all the drive shocks back through the gearbox. The original version ran for a number of fights at modelworld 2006? and even won some, especially the sumo, which favoured its very low profile. I've just rebuilt the gearboxes with all metal gears, and tested it, and it seems it should last for at least one fight… but as I put it in the car after testing, I noted one of the wheels had nearly fallen off. Mark that bolt for Lockthreading! All this got me thinking if I could make something less likely to lose a wheel, break a gearbox etc I have a huge pile of bits and bobs that were destined for heavie...

robot rebuilds

For two years in a row I've missed out joining in with Ian Watts robot bash at the Uni. So I'm making sure I've got something running before it swings around again. So I welded a couple of new gearbox cages into the 4 wheel push bot, and dug out a set of Electronize speed controllers. I fitted the titanium plate that has been cluttering the basement for a decade and have been doing some testing with a set of LiON batteries that used to belong to a cordless strimmer, which fell apart from overuse. I've run it up and the battery doesn't really have enough life to power 4 motors, but is useful for testing. I've stuck some old NiMH units on a charge cycle to see if they have enough life for a bout or two. The only things I actually need to "buy" are a 2.4GHz radio set, as the old 40MHz stuff is against the rules these days, so I've ordered a Hobby King 4 channel set for £20 off ebay. Strangely yesterday Mentorn emailed a bunch of robot folk to...

Still waiting for the gears.... so no wheels yet

13/2/01- Still waiting for the gears.... so no wheels yet Revised Specifications for Killer Carrot 1 Chassis Mig welded 35x15mm 2mm box ERW steel, forming a 400x400x200  cross-braced perimeter frame. Motors 2 x 24v surplus hi torque (weedy) motors from display electronics. (Don't buy these, save your cash and buy something decent from Roger Plant) Speed Controllers 2 x 4QD NCC35-24 through a DCI, pots linked to 2 Futaba S3003 servos. Radio gear Futaba Skysport  T6YFK, 6 Channel Tx, 40MHz fm, FP-R138DF 8 channel dual conversion receiver, with 1 RF-1 failsafe. Weight Middleweight, under 50kg Drive train Motorcycle sprockets and chains 8.2:1 reduction on new 10" pneumatic tyres, giving around 8.5mph top speed Batteries 2  Micro kiel 18AH 12v's Weapons 40mm pneumatic ram giving around 60kg's of lift via a pivoted arm, rear mounted spikes for ramming. Armour 3mm BASF RESART polycarbonate Special features Can run upside down. So here we h...