
Something Nasty in the woodshed

21-6-02- Something Nasty in the woodshed
Well here's the results of our grinder fest... we removed about 15kgs of unsightly fat,(steel and lexan), and then welded back in about 3kgs of extra bracing, wheelie bars and support struts. this should mean that the flipper now has something to flip against instead of merely lifting the front end. You can also see the delightful conditions which I usually work in... ie a 4 ft wide leanto. The snails are very fond of this carrot!
Here's the revised face of KC2, the flipper is basically U and Box section 2.5 mm steel that I blagged from some engine stands that were being lobbed from the college workshops. The surface is covered in a dual layer of 3mm lexan, which won't stop the axes, but does give a nice shiney canvas for my artistry. The new interface has been relocated. Pete Hollaway phoned to say he'd looked at the site and noticed that I had the interface in a box with the speed controllers. Apparently this makes a nice Faraday Cage, cause all manner of japes.
I go on the line to RS who sold me a new ally box, then told me they couldn't deliver as it was the last on ein the Country, and someone in Reading had picked it up first..BAH! So I contacted Paul at Technobots, who said he had a stash of boxes, but then RS phoned back with an alternative. The moral of the story is to go straight to Technobots who won't mess you about
Talking of Technobots I've now installed my new stubby extinguisher, which meets the standards in the RW regs, and has a certifcate of conformity.
The two switches on top of the box are running the flipper at the minute, as the prototype interface board can only put out 1amp, the production units should handle 6 amps... ouch!... more about this as and when.

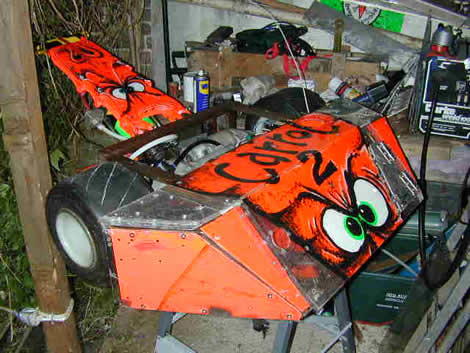
Finally, the last shall become first. Yes what was the front of KC2 is now the rump... I left the eyes as they looked a bit cape fear, and I'd run out of lexan... talk about scrapheap challenge. Overall armour is dual 3mm lexan with 6mm ally chequer plate, over vital (expensive components), 3x3mm lexan over other bits and whatever was lying around in the lean to for the rest,
Next most important job is to weigh the beastie, so I know if I can add some more struts to guard my poor wheels.

Comments

Popular posts from this blog

robot rebuilds

For two years in a row I've missed out joining in with Ian Watts robot bash at the Uni. So I'm making sure I've got something running before it swings around again. So I welded a couple of new gearbox cages into the 4 wheel push bot, and dug out a set of Electronize speed controllers. I fitted the titanium plate that has been cluttering the basement for a decade and have been doing some testing with a set of LiON batteries that used to belong to a cordless strimmer, which fell apart from overuse. I've run it up and the battery doesn't really have enough life to power 4 motors, but is useful for testing. I've stuck some old NiMH units on a charge cycle to see if they have enough life for a bout or two. The only things I actually need to "buy" are a 2.4GHz radio set, as the old 40MHz stuff is against the rules these days, so I've ordered a Hobby King 4 channel set for £20 off ebay. Strangely yesterday Mentorn emailed a bunch of robot folk to

The weakness of machines

All of the robots I have built have failed in fights, and usually at the axles/wheels, it's like a running joke. So why should it be any different with this featherweight? Meathammer was designed back in 2005/06 when using 4 drill motors was a bit of a novelty... it was made more novel still by mounting the epicyclic gear cages directly to the chassis, which unfortunately sends all the drive shocks back through the gearbox. The original version ran for a number of fights at modelworld 2006? and even won some, especially the sumo, which favoured its very low profile. I've just rebuilt the gearboxes with all metal gears, and tested it, and it seems it should last for at least one fight… but as I put it in the car after testing, I noted one of the wheels had nearly fallen off. Mark that bolt for Lockthreading! All this got me thinking if I could make something less likely to lose a wheel, break a gearbox etc I have a huge pile of bits and bobs that were destined for heavie

Fake Plastic Trees...

So, for a bit of light relief I bought a few of Justin's LED Christmas tree kits. I think the original idea was to have a relatively easy kit to put together on Saturday workshops in the run up to Christmas, but they seem to have become quite popular with all manner of folk. Anyway, the kit is based around a couple of well made pcbs, a bag full of components, and the simple instruction that +ve is UP. It took about 10 mins to solder all the bits together, and with a huge amount of satisfaction over the end result. Justin and his Christmas tree kits can be found here: http://cyber-lane.com/ The Build Brighton Christmas workshops will be running each Saturday from 30th November to 21st December from 10am – 2pm. Entrance is completely free. Kits are priced between £2 and £5. #BuildBrighton can be found here: http://www.buildbrighton.com/blog/